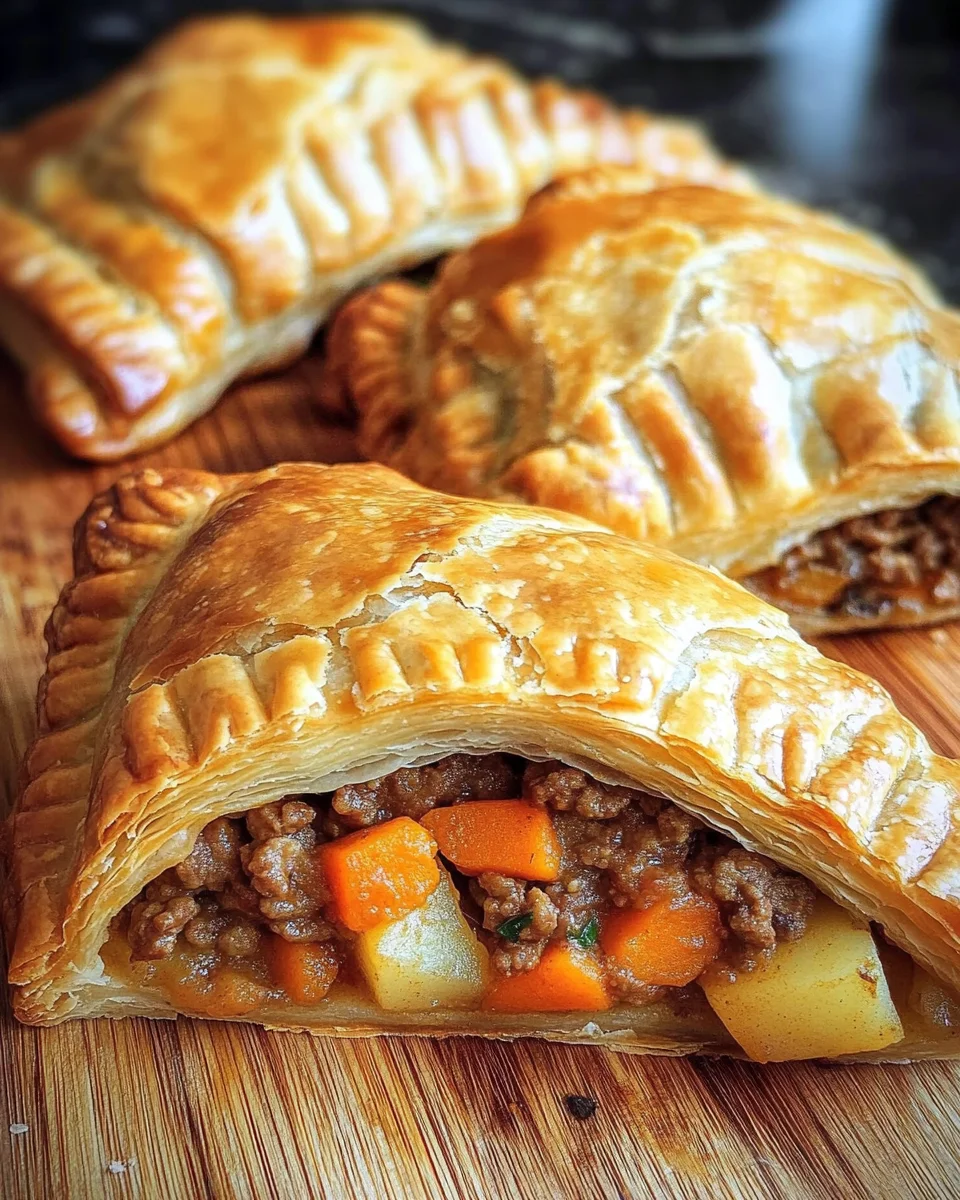
Irish Pasties: 5 Comforting Bites You Can’t Resist
Irish pasties: 5 comforting bites you can’t resist are the ultimate in savory pastries. Perfect for any occasion, these delicious bites combine tender meat and fresh vegetables in a flaky crust. Whether you’re preparing a family meal, hosting friends, or simply craving comfort food, these pasties offer warmth and flavor that will leave everyone satisfied. Their versatility allows them to be enjoyed as a main dish or a delightful snack.
Why You’ll Love This Recipe
- Easy to Make: With simple ingredients and clear steps, you’ll have these pasties ready in no time.
- Flavor Packed: The combination of seasoned beef, potatoes, and carrots creates a hearty filling that is sure to impress.
- Versatile Option: Customize your filling with different meats or vegetables based on what you have on hand.
- Perfect for Meal Prep: Make a batch in advance and freeze them for quick weeknight meals.
- Family-Friendly: Kids and adults alike will love these tasty treats, making them great for family dinners.
Tools and Preparation
To make your Irish pasties, you’ll need some essential tools. Having the right equipment can make your cooking experience smoother and more enjoyable.
Essential Tools and Equipment
- Rolling pin
- Mixing bowl
- Skillet
- Baking sheet
- Fork
Importance of Each Tool
- Rolling pin: Ensures even dough thickness for a perfect crust.
- Mixing bowl: Provides space to combine ingredients without mess.
- Skillet: Ideal for cooking the filling evenly and thoroughly before assembling the pasties.
Ingredients
For the Pastry Crust
- 2 cups all-purpose flour
- 1/2 cup unsalted butter
- 1/4 cup cold water
- 1 teaspoon salt
For the Filling
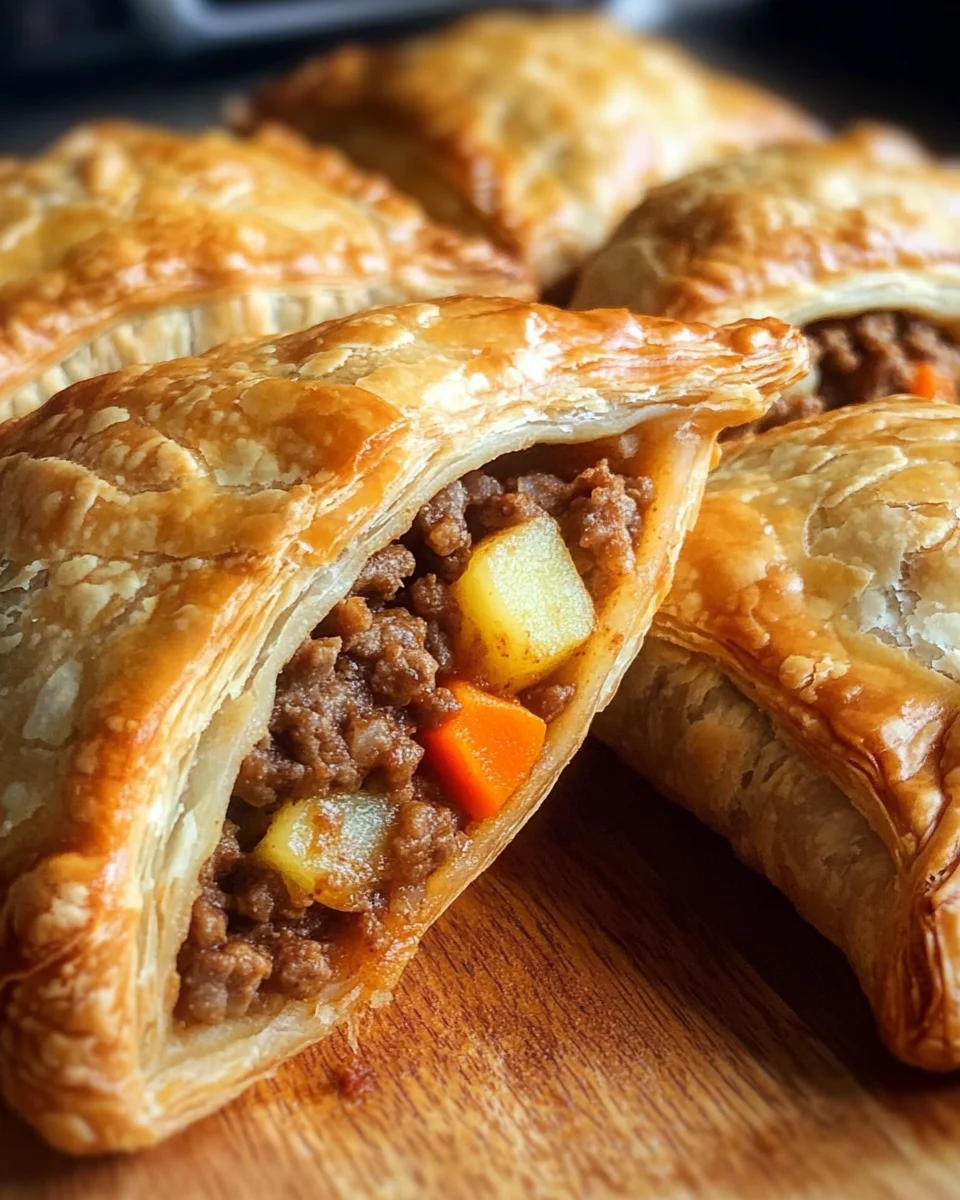
- 1/2 pound ground beef
- 1/2 cup diced potatoes
- 1/2 cup diced carrots
- 1 onion, chopped
- 1/2 teaspoon black pepper
For Finishing Touches
- 1 egg, beaten (for egg wash)
How to Make Irish Pasties: 5 Comforting Bites You Can’t Resist
Step 1: Preheat the Oven
Preheat your oven to 375°F (190°C) so it’s ready when you’re finished assembling your pasties.
Step 2: Prepare the Dough
- In a mixing bowl, combine flour and salt until well mixed.
- Cut in butter, mixing until the mixture resembles crumbs.
- Gradually add cold water, stirring until a dough forms.
Step 3: Roll Out the Dough
Roll out the dough on a floured surface until it reaches about 1/8 inch thickness. Use a round cutter or a glass to cut out circles from the dough.
Step 4: Cook the Filling
In a skillet over medium heat:
1. Cook ground beef, onion, potatoes, and carrots together until tender.
2. Season with salt and black pepper. Stir well to combine.
Step 5: Assemble the Pasties
- Place a spoonful of filling on one half of each dough circle.
- Fold over to create a semi-circle shape.
- Use a fork to seal the edges tightly.
Step 6: Brush with Egg Wash
Using a pastry brush, apply the beaten egg over each pasty for that beautiful golden finish.
Step 7: Bake Until Golden Brown
Place assembled pasties on a baking sheet lined with parchment paper. Bake for 25-30 minutes or until they are golden brown.
Enjoy your delicious Irish pasties as comforting bites that everyone will adore!
How to Serve Irish Pasties: 5 Comforting Bites You Can’t Resist
Irish pasties are versatile and can be served in various ways to enhance their deliciousness. Here are some serving suggestions to make the most of your comforting bites.
With a Side Salad
- A fresh garden salad adds a crunchy texture and balances the richness of the pasties.
Dipped in Gravy
- Serve your pasties with a side of savory gravy for added moisture and flavor.
Accompanied by Mashed Potatoes
- Creamy mashed potatoes pair perfectly, making for a hearty meal that warms you up.
Topped with Hot Sauce
- For those who like a little heat, drizzle some hot sauce on top of your pasties for a spicy kick.
Served with Pickles
- The tanginess of pickles complements the savory filling of the pasties, adding an exciting contrast.
How to Perfect Irish Pasties: 5 Comforting Bites You Can’t Resist
Perfecting your Irish pasties takes just a few tips to elevate them further. Here’s how you can ensure they turn out delicious every time.
- Use cold ingredients – Keeping the butter and water cold helps create a flaky crust.
- Don’t overfill – Ensure you leave enough space when filling to properly seal each pasty.
- Crimp edges securely – A good seal prevents any filling from leaking out during baking.
- Experiment with fillings – Try different vegetables or meats to customize flavors based on your preferences.
- Brush with egg wash – This gives the crust a beautiful golden color and shiny finish.
Best Side Dishes for Irish Pasties: 5 Comforting Bites You Can’t Resist
Complementing your Irish pasties with the right side dishes can enhance your dining experience. Here are some fantastic options to consider:
- Coleslaw – A crunchy coleslaw adds freshness and texture, balancing the richness of the pastries.
- Roasted Vegetables – Colorful roasted veggies provide not only flavor but also nutrients.
- Baked Beans – The sweetness of baked beans pairs well, adding another layer of comfort.
- Steamed Broccoli – Lightly steamed broccoli offers a healthy green option that brightens up the plate.
- Corn on the Cob – Sweet corn adds a delightful crunch that complements the savory flavors.
- Potato Wedges – Crispy potato wedges are always a favorite; season them as desired for extra flavor.
- Cucumber Salad – A refreshing cucumber salad adds brightness and is easy to whip up.
- Garlic Bread – For those who love carbs, garlic bread provides an aromatic addition that pairs well with any savory dish.
Common Mistakes to Avoid
When making Irish pasties, it’s easy to overlook some key details. Here are common mistakes to avoid for the best results.
- Using warm ingredients: Ensure the butter and water are cold. This keeps the pastry flaky and delicious.
- Overfilling the pasties: Avoid adding too much filling. It can cause leaks during baking and ruin the shape.
- Not sealing edges properly: Make sure to seal the edges well with a fork. This prevents the filling from escaping while baking.
- Skipping the egg wash: Brushing with beaten egg gives your pasties a beautiful golden color and enhances their flavor.
- Not preheating the oven: Always preheat your oven before baking. This ensures even cooking and helps achieve that perfect crust.
Storage & Reheating Instructions
Refrigerator Storage
- Store in an airtight container for up to 3 days.
- Allow pasties to cool completely before refrigerating.
Freezing Irish Pasties: 5 Comforting Bites You Can’t Resist
- Wrap each pasty tightly in plastic wrap or foil.
- Freeze for up to 3 months for best quality.
Reheating Irish Pasties: 5 Comforting Bites You Can’t Resist
- Oven: Preheat to 350°F (175°C) and bake for about 15-20 minutes until heated through.
- Microwave: Heat on high for 1-2 minutes, checking frequently to avoid sogginess.
- Stovetop: Warm in a skillet over medium heat for about 5-7 minutes, flipping halfway through.
Frequently Asked Questions
What are Irish pasties?
Irish pasties are savory pastries filled with meat and vegetables, making them a perfect comfort food option.
How do I customize my Irish pasties?
You can customize fillings by adding different meats or vegetables. Try using chicken, lamb, or even vegetarian options!
Can I use store-bought pastry?
Yes! Using store-bought pastry makes preparation quicker if you’re short on time.
Are Irish pasties healthy?
With lean meat and vegetables, they can be part of a balanced diet. Adjust ingredients for a healthier version if desired.
How long does it take to prepare Irish pasties?
The total time is about one hour, including prep and cooking time. It’s a quick dish for a comforting meal.
Final Thoughts
Irish pasties are not only warm and comforting but also incredibly versatile. Whether you stick with traditional fillings or get creative, these savory pastries will surely satisfy your cravings. Try them out today and feel free to mix up the ingredients based on your preferences!
Irish Pasties: 5 Comforting Bites You Can’t Resist

Irish pasties are the ultimate comfort food that blends tender meat and fresh vegetables wrapped in a flaky, golden crust. Perfect for family dinners, gatherings with friends, or simply satisfying a craving, these savory pastries deliver warmth and flavor in every bite. Easy to make and highly customizable, you can incorporate different fillings based on your preferences or what you have on hand. Enjoy them as a hearty main dish or a delightful snack any time of the day.
- Prep Time: 20 minutes
- Cook Time: 30 minutes
- Total Time: 50 minutes
- Yield: Makes approximately 6 servings 1x
- Category: Main
- Method: Baking
- Cuisine: Irish
Ingredients
- 2 cups all-purpose flour
- 1/2 cup unsalted butter
- 1/4 cup cold water
- 1 teaspoon salt
- 1/2 pound ground beef
- 1/2 cup diced potatoes
- 1/2 cup diced carrots
- 1 onion, chopped
- 1/2 teaspoon black pepper
- 1 egg (for egg wash)
Instructions
- Preheat your oven to 375°F (190°C).
- In a mixing bowl, combine flour and salt. Cut in butter until crumbly, then gradually add cold water to form a dough.
- Roll out the dough to about 1/8 inch thickness and cut into circles.
- Cook ground beef, onion, potatoes, and carrots in a skillet over medium heat until tender; season with salt and pepper.
- Place filling on one half of each dough circle, fold over, and seal edges with a fork.
- Brush each pasty with beaten egg for a golden finish.
- Bake on a parchment-lined baking sheet for 25-30 minutes until golden brown.
Nutrition
- Serving Size: 1 pasty (150g)
- Calories: 345
- Sugar: 0g
- Sodium: 486mg
- Fat: 19g
- Saturated Fat: 10g
- Unsaturated Fat: 8g
- Trans Fat: 0g
- Carbohydrates: 30g
- Fiber: 2g
- Protein: 12g
- Cholesterol: 50mg