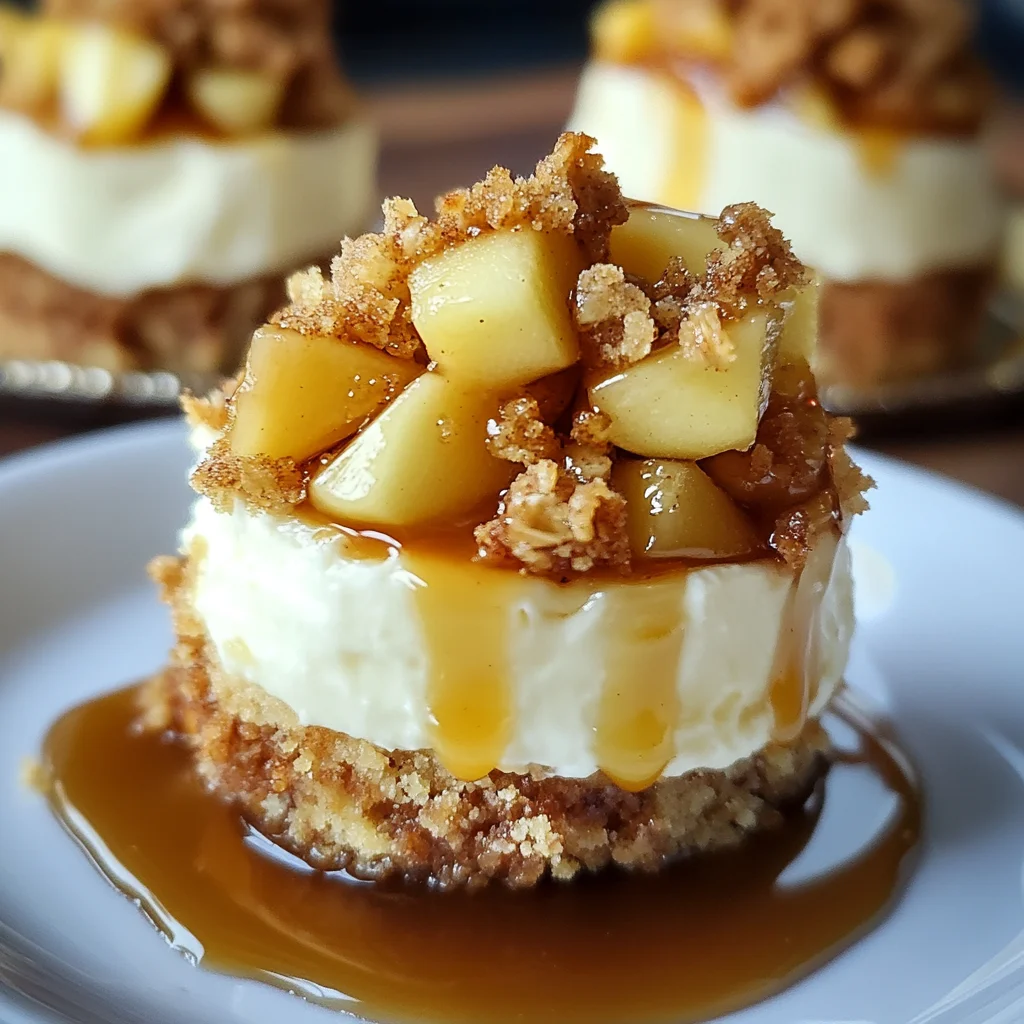
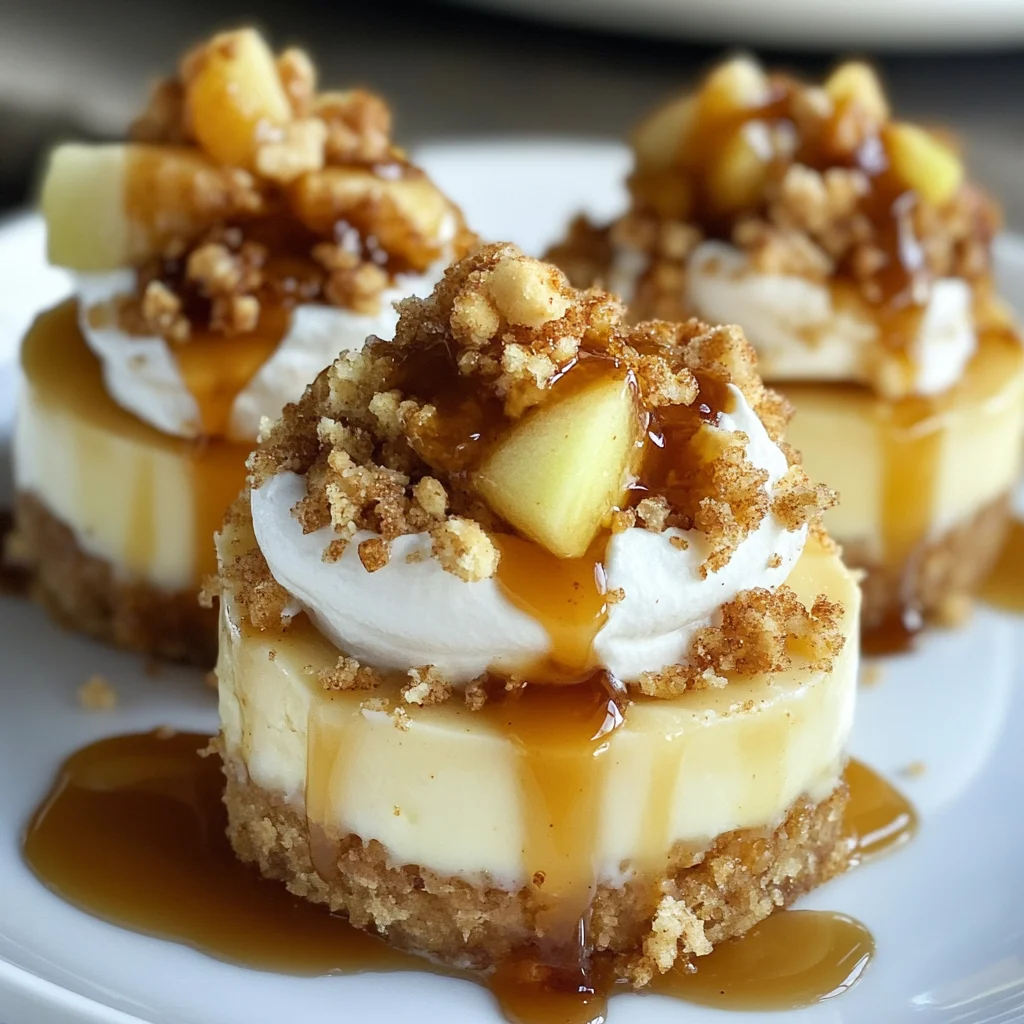
Apple Crisp Mini Cheesecakes
If you’re looking for a dessert that warms your heart and fills your home with the cozy aroma of fall, look no further than these delightful Apple Crisp Mini Cheesecakes. They are the perfect blend of creamy cheesecake, spiced apples, and a buttery oat topping nestled in a graham cracker crust. Imagine serving these cuties at a family gathering or enjoying them after a busy weeknight dinner—they’re sure to bring smiles all around!
What makes this recipe special is its individual servings, making it easy to share without the fuss of slicing a larger cake. Plus, they’re simple enough for even the busiest bakers to whip up! Trust me, once you experience the comforting flavors and textures of these Apple Crisp Mini Cheesecakes, they will become a beloved staple in your dessert repertoire.
Why You’ll Love This Recipe
- Quick to prepare: With just 20 minutes of prep time, you’ll have these mini cheesecakes ready to bake in no time!
- Perfect for sharing: Each mini cheesecake is portioned perfectly for everyone to enjoy their very own dessert.
- Autumn flavors galore: The combination of spiced apples and cinnamon brings the essence of fall into every bite.
- Make-ahead convenience: These cheesecakes can be prepared ahead of time and stored in the fridge until you’re ready to serve.
- Dress them up: A drizzle of caramel sauce adds an extra touch that makes these desserts feel special for any occasion.
Ingredients You’ll Need
These Apple Crisp Mini Cheesecakes use simple, wholesome ingredients that you probably already have in your pantry. Let’s gather what we need for this delicious treat!
For the Crust:
- 3/4 cup graham cracker crumbs
- 1 1/2 tablespoons sugar
- 1/2 teaspoon cinnamon
- 3 tablespoons unsalted butter, melted
For the Cheesecake Filling:
- 10 oz cream cheese, softened
- 6 tablespoons sugar
- 1 1/2 teaspoons vanilla
- 2 teaspoons all-purpose flour
- 1 egg
For the Spiced Apples:
- 2 medium-small apples, peeled and chopped finely
- 2 teaspoons freshly squeezed lemon juice
- 1 1/2 teaspoons cinnamon
- 1/4 teaspoon nutmeg
- 2 tablespoons light brown sugar
- 1 1/2 teaspoons cornstarch
For the Streusel Topping:
- 1/3 cup all-purpose flour
- 1/3 cup light brown sugar
- 1/3 cup quick-cooking oats
- 3/4 teaspoon cinnamon
- 1/8 teaspoon nutmeg
- 2 1/2 tablespoons unsalted butter, melted
To Serve:
- Caramel sauce for drizzling
Variations
This recipe is wonderfully flexible! Feel free to get creative with flavors or swap out ingredients based on what you have on hand.
- Try different fruits: Swap out apples for pears or berries for a fresh twist on the filling!
- Switch up the spices: Experiment with pumpkin pie spice instead of cinnamon and nutmeg for an extra autumnal flavor.
- Use gluten-free options: Substitute graham cracker crumbs and flour with gluten-free alternatives to make this dessert suitable for everyone.
- Add nuts: Sprinkle some chopped walnuts or pecans into the streusel topping for an added crunch.
How to Make Apple Crisp Mini Cheesecakes
Step 1: Prepare Your Cupcake Pan
Start by lining a standard cupcake pan with paper liners. This helps keep your mini cheesecakes intact and makes cleanup a breeze! Preheat your oven to 325°F so it’s nice and hot when it’s time to bake.
Step 2: Make the Graham Cracker Crust
In a bowl, mix together your graham cracker crumbs, sugar, and cinnamon. Then add in the melted butter and stir until everything is combined. Press about two tablespoons of this mixture into each liner firmly; this will form your tasty crust. Don’t forget to pop them in the fridge while you prepare the next steps!
Step 3: Prepare the Streusel Topping
For that irresistible crunchy finish, combine flour, brown sugar, oats, cinnamon, and nutmeg in another bowl. Add melted butter and mix until coarse crumbs form. Refrigerating this mixture allows it to firm up slightly before baking.
Step 4: Whip Up Your Cheesecake Filling
In a mixing bowl, beat together softened cream cheese with sugar until smooth. Add vanilla and flour before mixing in an egg—just until combined. This creates that luscious filling we all love!
Step 5: Assemble Your Mini Cheesecakes
Spoon that creamy cheesecake filling over each crust so they’re filled about two-thirds full. It’s okay if they don’t look perfect; they’ll bake beautifully!
Step 6: Prepare Your Spiced Apples
In another bowl, toss chopped apples with lemon juice, brown sugar, cornstarch, cinnamon, and nutmeg. This will infuse those apples with amazing flavor!
Step 7: Add Apples to Cheesecake Filling
Spoon your apple mixture generously over each cheesecake filling. Gently press down with your palm; this helps incorporate those sweet apple bits into your cheesecake.
Step 8: Top with Streusel
Sprinkle that delicious streusel topping over each cheesecake generously—it’s going to create that wonderful crisp texture we crave!
Step 9: Bake Away!
Slide your pan into the preheated oven and bake for about 28-30 minutes until the edges are set but centers may still jiggle slightly. This will ensure they stay creamy!
Step 10: Cool & Serve
Let them cool in the pan for about 30 minutes before transferring them to chill in the fridge. When ready to serve, drizzle each mini cheesecake with caramel sauce for an extra touch of sweetness!
Enjoy every bite of these Apple Crisp Mini Cheesecakes—you deserve it!
Pro Tips for Making Apple Crisp Mini Cheesecakes
These delightful mini cheesecakes are sure to impress, and with a few handy tips, you can ensure they turn out perfectly every time!
- Use room temperature cream cheese: This helps create a smooth batter without lumps, resulting in a creamy texture that melts in your mouth.
- Don’t overmix the batter: Mixing just until combined will prevent the cheesecake from cracking during baking, giving you a beautiful presentation.
- Chill before serving: Allowing the cheesecakes to cool and set in the refrigerator enhances their flavor and makes them easier to serve.
- Experiment with apple varieties: Different apples bring unique flavors and textures; try using a mix of Granny Smith for tartness and Honeycrisp for sweetness.
- Add extra spices if desired: Feel free to adjust the cinnamon and nutmeg levels based on your personal taste preferences for a more customized flavor profile!
How to Serve Apple Crisp Mini Cheesecakes
When it comes time to present these scrumptious treats, there are plenty of creative ways to make them shine at your gathering or family dinner!
Garnishes
- Whipped coconut cream: A dollop of this dairy-free alternative adds creaminess and balances the sweetness of the dish.
- Chopped nuts: Sprinkle some toasted pecans or walnuts on top for an added crunch and depth of flavor.
- Fresh apple slices: Decorate each mini cheesecake with thin slices of apple for a fresh touch that ties back to the filling.
Side Dishes
- Vanilla or caramel ice cream: A scoop alongside these mini cheesecakes complements their flavors beautifully while adding a creamy texture.
- Warm spiced cider: This comforting beverage enhances the autumn vibe and pairs nicely with the flavors of the cheesecakes.
- Mixed green salad with vinaigrette: A light salad provides a refreshing contrast to the richness of the dessert, balancing out your meal.
- Pumpkin soup: Serving this warm soup as an appetizer creates a cozy fall dining experience that leads perfectly into dessert.
Embrace these serving suggestions, and enjoy sharing your Apple Crisp Mini Cheesecakes with family and friends! Happy baking!
Make Ahead and Storage
These Apple Crisp Mini Cheesecakes are perfect for meal prep! You can whip them up in advance, allowing you to enjoy a delightful dessert anytime without the fuss.
Storing Leftovers
- Store leftover mini cheesecakes in an airtight container in the refrigerator.
- They will keep well for up to 3-4 days.
- For best taste, allow them to sit at room temperature for about 15 minutes before serving.
Freezing
- To freeze, place the cooled mini cheesecakes in a single layer on a baking sheet until firm.
- Once frozen, transfer them to an airtight container or freezer bag.
- They can be frozen for up to 2 months.
- Thaw overnight in the refrigerator before enjoying.
Reheating
- If you prefer them warm, preheat your oven to 325°F (163°C).
- Place the mini cheesecakes on a baking sheet and heat for about 10-15 minutes until warmed through.
- Alternatively, you can microwave them for about 15-20 seconds.
FAQs
Here are some common questions about these delightful treats.
Can I use different fruits in Apple Crisp Mini Cheesecakes?
Absolutely! Feel free to experiment with other fruits such as pears or berries. Just adjust the spices accordingly.
How long do Apple Crisp Mini Cheesecakes last?
Stored properly in the fridge, Apple Crisp Mini Cheesecakes will last about 3-4 days. Enjoy them as they remain delicious!
What if I don’t have quick-cooking oats for the streusel?
If you don’t have quick-cooking oats on hand, regular rolled oats work just fine! Just chop them a bit finer if you prefer a smoother texture.
Can I make this recipe gluten-free?
Yes! Simply substitute regular graham cracker crumbs and flour with gluten-free alternatives. It works wonderfully!
Final Thoughts
I hope you find joy in making these Apple Crisp Mini Cheesecakes! They truly capture the essence of autumn with their warm spices and creamy filling. It’s such a pleasure to share this recipe with you, and I can’t wait for you to experience the delightful flavors. Happy baking!
Apple Crisp Mini Cheesecakes

Indulge in the cozy flavors of fall with these delightful Apple Crisp Mini Cheesecakes. Each individual serving combines a creamy cheesecake filling infused with spiced apples, all nestled in a buttery graham cracker crust and topped with a crunchy streusel. Perfect for gatherings or a sweet treat after dinner, these mini cheesecakes are easy to prepare and sure to impress. With their warm aromas and delicious textures, they capture the essence of autumn in every bite. Whether drizzled with caramel sauce or enjoyed as is, these treats will become a staple in your dessert repertoire.
- Prep Time: 20 minutes
- Cook Time: 30 minutes
- Total Time: 50 minutes
- Yield: 12 servings 1x
- Category: Dessert
- Method: Baking
- Cuisine: American
Ingredients
- 3/4 cup graham cracker crumbs
- 1 1/2 tablespoons sugar
- 1/2 teaspoon cinnamon
- 3 tablespoons unsalted butter, melted
- 10 oz cream cheese, softened
- 6 tablespoons sugar
- 1 1/2 teaspoons vanilla
- 2 teaspoons all-purpose flour
- 1 egg
- 2 medium-small apples, peeled and chopped finely
- 2 teaspoons freshly squeezed lemon juice
- 1 1/2 teaspoons cinnamon
- 1/4 teaspoon nutmeg
- 2 tablespoons light brown sugar
- 1 1/2 teaspoons cornstarch
- 1/3 cup all-purpose flour
- 1/3 cup light brown sugar
- 1/3 cup quick-cooking oats
- 3/4 teaspoon cinnamon
- 1/8 teaspoon nutmeg
- 2 1/2 tablespoons unsalted butter, melted
- Caramel sauce for drizzling
Instructions
- Preheat oven to 325°F and line a cupcake pan with paper liners.
- Mix graham cracker crumbs, sugar, cinnamon, and melted butter; press into liners to form crusts.
- Combine flour, brown sugar, oats, cinnamon, and nutmeg for streusel topping; refrigerate.
- Beat softened cream cheese with sugar until smooth; add vanilla, flour, and an egg.
- Spoon cheesecake filling over crusts; top with spiced apple mixture and streusel.
- Bake for 28-30 minutes until edges are set but centers jiggle slightly.
- Cool in the pan for 30 minutes before refrigerating until ready to serve.
Nutrition
- Serving Size: 1 mini cheesecake (60g)
- Calories: 215
- Sugar: 12g
- Sodium: 135mg
- Fat: 10g
- Saturated Fat: 5g
- Unsaturated Fat: 4g
- Trans Fat: 0g
- Carbohydrates: 30g
- Fiber: 1g
- Protein: 3g
- Cholesterol: 30mg