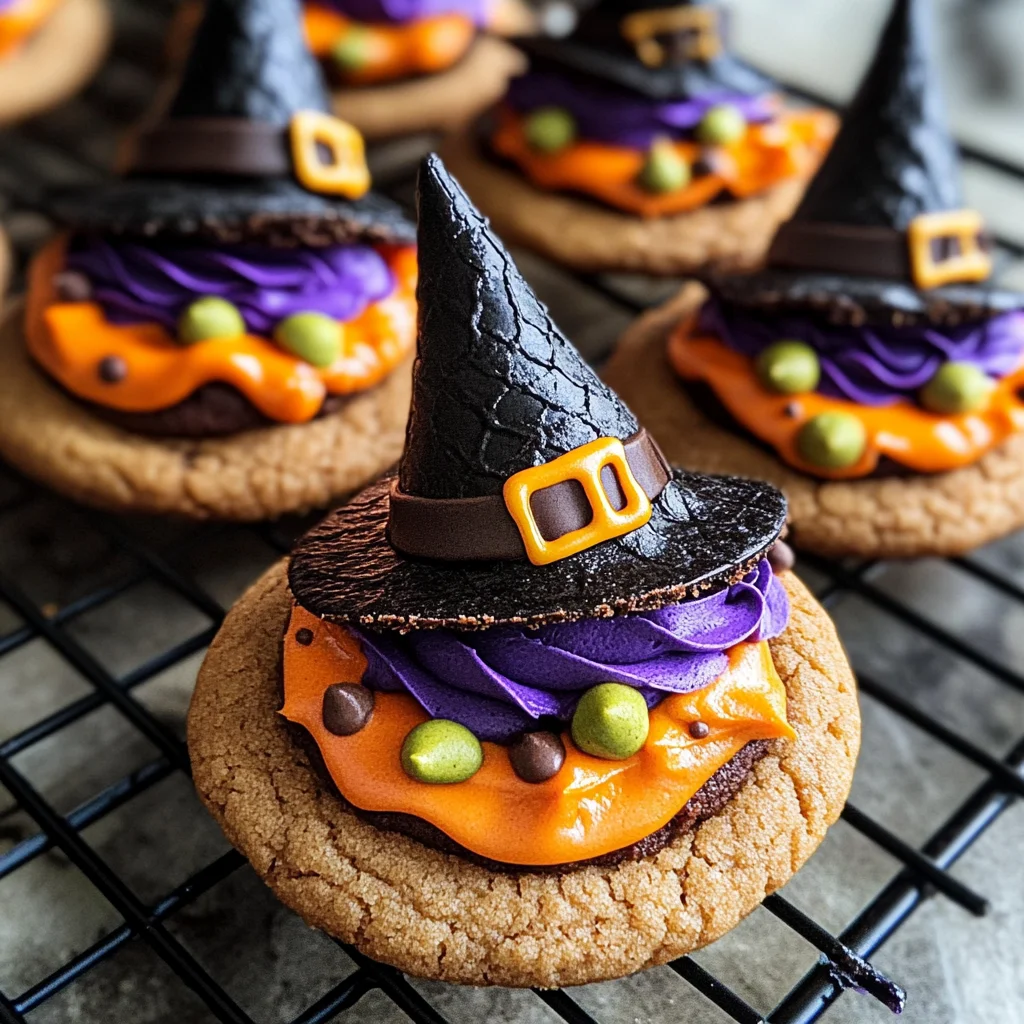
Halloween Witch Hat Cookies
If you’re looking for a delightful treat that will enchant your Halloween gatherings, these Halloween Witch Hat Cookies are just the thing! Imagine crunchy chocolate cookies topped with whimsical cake cones, all dressed up in vibrant icing. Not only are they adorable, but making these cookies is also a fantastic way to spend time with family or friends. Whether you’re hosting a spooky soirée or simply want to create some festive fun at home, this recipe is sure to bring smiles all around.
What makes these cookies truly special is their versatility and the opportunity for creativity! You can customize them however you like, from the colors of the icing to the types of cookie bases you use. So gather your little ghouls and goblins, roll up your sleeves, and let’s get started on making some magical Halloween Witch Hat Cookies!
Why You’ll Love This Recipe
- Easy to Prepare: With simple steps and easy-to-find ingredients, this recipe is perfect for bakers of all skill levels.
- Family-Friendly Fun: Kids will love getting involved in the decorating process, making it a great activity for family bonding.
- Customizable Designs: Get creative with different colors and decorations—each cookie can be unique!
- Perfect for Any Occasion: These cookies are not only great for Halloween but can also brighten any fall-themed gathering.
- Deliciously Chocolatey: The rich chocolate flavor pairs perfectly with the sweet icing and crunchy cones.
Ingredients You’ll Need
To create these charming Halloween Witch Hat Cookies, you’ll need some simple and wholesome ingredients. Most of them are readily available at your local grocery store or online. Let’s take a look at what you’ll need to whip up these delightful treats!
- Favorite Cake Mix or try Wilton’s Chocolate Cake Recipe
- Store Bought Chocolate Cookies or try this recipe from Wilton
- Lemon Yellow Icing Color
- Black Color Mist Food Coloring Spray
- Rose Icing Colors Pink Food Coloring
- Violet Icing Color, Gel Food Coloring
- Golden Yellow Icing Color
- Orange Icing Color
- Sugar Cones
- Creamy White Decorator Icing, 4 lb. Tub
Variations
This recipe is wonderfully flexible, allowing you to adapt it based on your preferences or what you have on hand. Here are some fun variations you might consider:
- Change the Cookie Base: Swap out chocolate cookies for vanilla or pumpkin-flavored ones to match the fall theme.
- Alter the Colors: Use different color combinations for icing to create a more whimsical look—think pastel shades for a non-traditional twist!
- Add Sprinkles: For extra fun, sprinkle edible glitter or spooky sprinkles on top of the icing before it sets.
- Try Different Toppings: Instead of sugar cones, experiment with mini ice cream cones or other cone shapes that catch your fancy.
How to Make Halloween Witch Hat Cookies
Step 1: Prepare & Bake the Cones
Start by preparing your cake mix according to the instructions provided in your chosen recipe. This is where the base of our witch hats comes together! Place a Cupcake Cones Baking Rack on a cookie sheet and insert your sugar cones into it. Fill each cone with about 2 tablespoons of cake batter. Baking them properly ensures they hold their shape well when assembled later.
Step 2: Spray the Cones
Once your cones are baked and cooled, trim off any excess cake that might have risen above the top of each cone using a knife. This step not only gives them a neat appearance but also allows for better decoration! Place them wide side down on parchment paper and spray with Black Color Mist food coloring. This adds an enchanting touch while letting them dry for about 10 to 15 minutes.
Step 3: Tint the Icing & Prepare the Bags
Now it’s time to add some color! Start by tinting 1 cup of creamy white decorator icing orange. Then mix another cup with violet and rose icing colors to create a lovely purple shade. Prepare two decorating bags fitted with tip 2B for both colored icings. Don’t forget about yellow; tint ¼ cup of creamy white decorator icing yellow using golden yellow and lemon yellow colors in another bag fitted with tip 3.
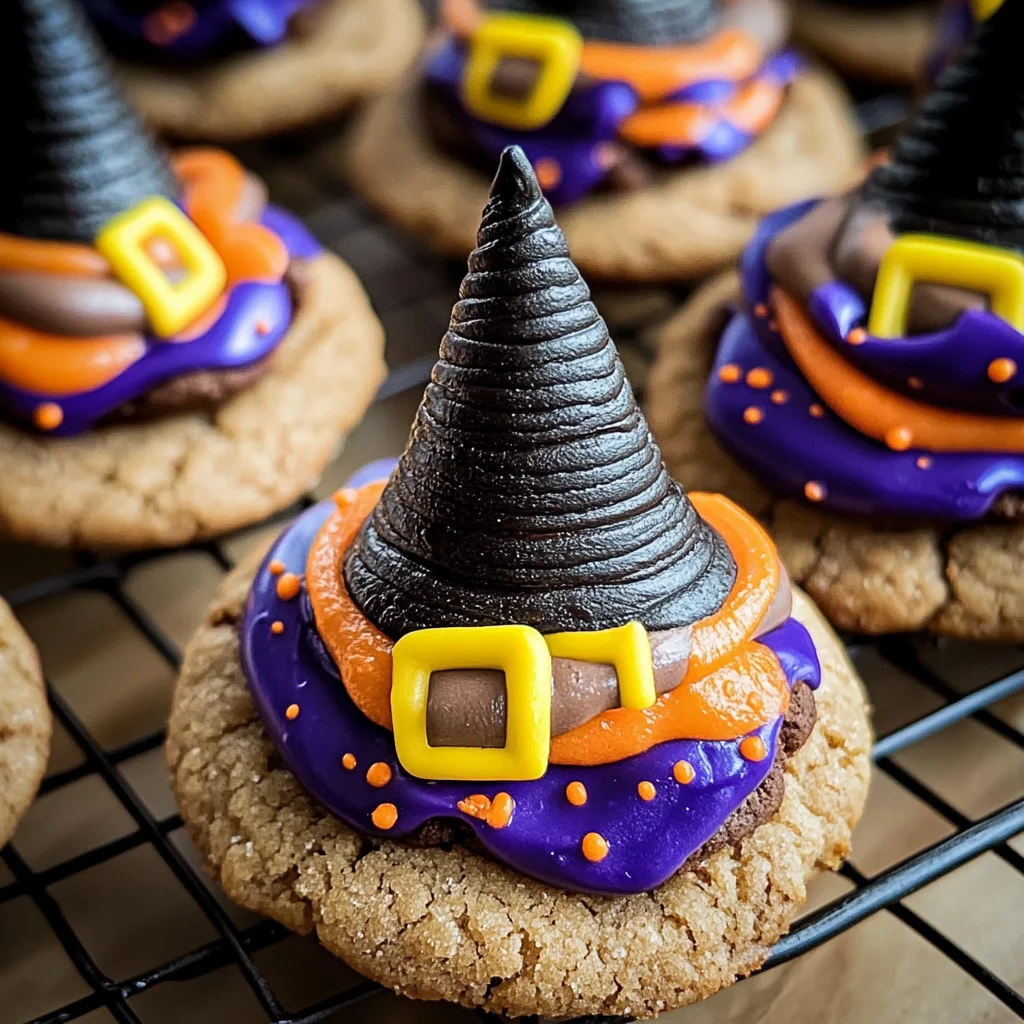
Step 4: Assemble the Witch Hats
Let’s bring those witch hats together! Using the orange icing, pipe a small dollop onto the middle of each cookie and place a cone on top. Next, pipe an orange band around half of the cones’ wide edges then smooth it out gently with a spatula—this gives them that polished hat look! Repeat this process using purple icing on the remaining cookies and cones. Allow them to set for about 15 to 20 minutes before finishing off by piping yellow icing around each band as a buckle. After another short wait of about 15 to 20 minutes… you can enjoy your marvelous creations!
Pro Tips for Making Halloween Witch Hat Cookies
Creating these delightful Halloween Witch Hat Cookies can be a fun and rewarding experience, especially with a few helpful tips up your sleeve!
- Use fresh ingredients: Ensure your cake mix and icing are fresh for the best flavor and texture. Stale ingredients can lead to dry cookies, which no one wants at Halloween!
- Practice piping: If you’re new to piping, practice on parchment paper before decorating your cookies. This will help you get comfortable with the motion and control of the icing.
- Let the cones cool completely: Make sure your baked sugar cones are fully cooled before spraying them with color mist. This prevents any melting or unwanted texture changes in your icing.
- Experiment with colors: Don’t hesitate to mix different shades of icing colors to create unique looks for your witch hats. A little creativity can make your cookies stand out even more!
- Involve the kids: Get your children involved in decorating! It’s a great way to bond and they’ll love expressing their creativity through different designs on their witch hats.
How to Serve Halloween Witch Hat Cookies
Presenting these whimsical cookies in an enchanting way can enhance their festive spirit. Here are some ideas to make them the star of your Halloween gathering.
Garnishes
- Sprinkles: Use colorful sprinkles or edible glitter to add a magical touch. They catch the light beautifully and make each cookie look like a little potion-filled delight!
- Candy Corn: Place a few pieces of candy corn around the base of each witch hat for an extra pop of color and a sweet treat that complements the chocolate flavors.
Side Dishes
- Pumpkin Soup: A warm bowl of creamy pumpkin soup adds a cozy touch to your dessert spread while maintaining that autumnal theme. The savory flavors contrast nicely with the sweetness of the cookies.
- Apple Slices with Caramel Dip: Fresh apple slices are refreshing and healthy, while caramel dip provides a sweet counterbalance that pairs well with the chocolatey cookies.
- Cheese Platter: Create a colorful cheese platter with an assortment of cheeses, crackers, and fruits. The savory elements provide balance alongside your sweet treats and will please both kids and adults alike.
By following these tips and serving suggestions, you’re sure to create a memorable Halloween treat that everyone will love! Enjoy baking, decorating, and sharing these fun Witch Hat Cookies with friends and family this spooky season!
Make Ahead and Storage
These Halloween Witch Hat Cookies are not only fun to make, but they are also perfect for meal prep! You can whip them up ahead of time for your Halloween gatherings or just to enjoy throughout the spooky season.
Storing Leftovers
- Store any leftover cookies in an airtight container at room temperature.
- They should stay fresh for up to 3 days.
- If you want to keep them longer, consider storing them in the fridge for up to a week.
Freezing
- For long-term storage, freeze the assembled cookies in a single layer on a baking sheet.
- Once frozen, transfer them to a freezer-safe bag or container, separating layers with parchment paper.
- They can be frozen for up to 2 months.
Reheating
- If you prefer your cookies slightly warm, preheat your oven to 300°F (150°C).
- Place the cookies on a baking sheet and heat for about 5-7 minutes until warmed through.
- Avoid reheating in the microwave as it may make them chewy instead of keeping their delightful crunch.
FAQs
Here are some common questions about making Halloween Witch Hat Cookies!
Can I use a different cake mix for Halloween Witch Hat Cookies?
Absolutely! You can use any flavor of cake mix you prefer. Just keep in mind that chocolate pairs wonderfully with the chocolate cookies and enhances the spookiness!
How do I customize my Halloween Witch Hat Cookies?
You can personalize these cookies by using different colors and decorations. Try adding sprinkles or edible glitter for extra flair, or even switch up the icing colors based on your favorite Halloween themes!
Are there any alternatives to sugar cones in Halloween Witch Hat Cookies?
Yes! If sugar cones aren’t available, you can use ice cream cones or waffle cones as an alternative. Just make sure they can support the weight of frosting and decoration.
How long do Halloween Witch Hat Cookies last?
When stored properly in an airtight container, your Halloween Witch Hat Cookies will last up to 3 days at room temperature and up to a week in the fridge.
Can I make these Halloween Witch Hat Cookies gluten-free?
Definitely! You can substitute your favorite gluten-free cake mix and chocolate cookies to create delicious gluten-free versions of these festive treats.
Final Thoughts
I hope you find joy in creating these whimsical Halloween Witch Hat Cookies! They are such a fun way to add some festive flair to your celebrations. Whether you’re making them with family or friends, they’re sure to spread smiles all around. Enjoy this delightful treat, and don’t hesitate to experiment with toppings and colors—you can’t go wrong when having fun in the kitchen!
Halloween Witch Hat Cookies

If you’re in search of a delightful treat to enchant your Halloween gatherings, look no further than these Halloween Witch Hat Cookies! These whimsical cookies feature crunchy chocolate bases topped with colorful cake cones, each dressed in vibrant icing. Perfect for family bonding or festive parties, this recipe allows for creativity and customization. With easy-to-follow steps and readily available ingredients, you’ll be able to craft these adorable treats that are sure to bring smiles to everyone around.
- Prep Time: 20 minutes
- Cook Time: 15 minutes
- Total Time: 35 minutes
- Yield: Approximately 12 cookies
- Category: Dessert
- Method: Baking
- Cuisine: American
Ingredients
- Favorite Cake Mix (such as vanilla or chocolate)
- Store-Bought Chocolate Cookies
- Sugar Cones
- Creamy White Decorator Icing
- Assorted Food Coloring (orange, black, yellow, purple, pink)
Instructions
- Preheat your oven and prepare the cake mix according to package instructions. Fill sugar cones with 2 tablespoons of batter and bake until set.
- Once cool, trim the cones if necessary and spray with black color mist.
- Tint decorator icing in orange, purple, and yellow. Prepare piping bags fitted with appropriate tips.
- Pipe a dollop of orange icing on each cookie base and place a cone on top. Decorate with colored icing bands and allow to set before serving.
Nutrition
- Serving Size: 1 serving
- Calories: 120
- Sugar: 14g
- Sodium: 50mg
- Fat: 5g
- Saturated Fat: 2g
- Unsaturated Fat: 3g
- Trans Fat: 0g
- Carbohydrates: 18g
- Fiber: 1g
- Protein: 1g
- Cholesterol: 0mg